engel me109 300

Dieter Schlueter`s Me 109

In 1965, Dieter Schlüter (yes, you read that right, the helicopter man Schlüter) designed a thoroughbred RC1 aerobatic model at the time. The Messerschmitt 109 served as a great role model.

Reutlingen, September 2025: I thought I couldn’t see right, but there stood a thoroughbred Schlüter Me 109, proudly built by Klaus Hartmann.

engel me109 02

We rummaged through our old archives and actually found a test report from 1965, written by the author at the time, Kt. Zech, which I don’t want to withhold from you.

engel me109 03

Almost true to the original in so far as a model construction can never be completely true to the original anyway. But in the case of the Me 109, the model compromises were largely modelled on the original. Although the designer, engineer Dieter Schlüter, has incorporated the unavoidable requirements of a model construction, such as enlarging the tail unit and changing the profile, the model of the Me 109 is still recognisable as a Me 109, whether with the original paintwork or “only” with a silver finish.

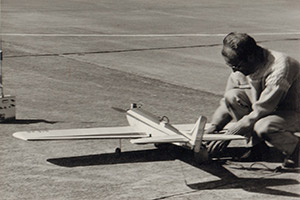
Even laymen standing around realised this straight away when we were on a runway close to a road and very close to a military training area during our first flight tests.

engel me109 04

Technical data:
Construction: cantilever low-wing monoplane in wood construction
Reproduction scale approx. 1:6
Wing span: 1700 mm
Wing area: 45 sqdm
Span of the tailplane: 600 mm
Tail content: 11.1 sqdm
Total wing area: 56.1 sqdm
Fuselage length: 1350 mm.
Wing loading: 66.7-71 g/sqdm
Total wing loading: 53.7-57 g/sqdm
Empty weight, ready to fly with engine, painted: approx. 2000 g
Payload: 1000-1200 g
Wing profile: NACA 2418
Empennage profile: sym. 9-13 °/o thickness
Engines: 8-10 ccm
Distributed by: Alexander Engel, Knittlingen

engel me109 05

This model was created from a development series of more than five models, all of which were intended to lead to the Me 109 from the outset, but not only to the Me 109 in form, but also to the point where it was possible not only to fly perfectly, but also to fly as safely and as high as possible.

aerospaz01
engel me109 06

You will learn in the course of this treatise that this has been achieved and, if you build the model yourself, you will also experience it.
With the Me 109 you can even fly the RC1 programme, the pinnacle of competition flying.

engel me109 07

The building history
In autumn 1965 I received the Me 109 kit for test purposes after the model was presented at the Nuremberg Trade Fair in 1965. A model like this takes time to build. This is not to say that this model is very time-consuming. On the contrary, this model can be built relatively quickly. But it had to be built, and then came the mud and then the harsh winter. Spring came very soon this time, but the deep mud had to dry out first. Only then the model could make its first start. In the meantime, while the construction of the Me 109 was being tackled in autumn, I had the opportunity to fly a Me. It was “only” sprayed with silver stretch paint and weighed a few grams less than mine did in the spring. But let’s start with the kit and the construction itself.

engel me109 08

The ribs are not punched as precisely as would be desirable. They have to be grouped together in the block and reworked well. The fuselage ribs are not quite symmetrical. The worst mistake, at least in the kit I had, was the engine mount (No. 9), which was cut out too small.

komet
It slipped through between the side boards and had to be sawn out from scratch. In this case, it would be better to use a printed board for sawing out yourself. You could check the fit before sawing it out!

That’s all there is to complain about with the kit.
On the other hand, there is less to complain about with the flight, actually nothing at all.

engel me109 09

But let’s get to the construction first

Schlüter has solved the constructional side with simple, conservative and stable means, without adding too many parts and odds and ends to the superstructure. The undercarriage mounting is well-known and commendable. The tail wheel could perhaps have had a better solution, but a steerable tail wheel with such a large distance to the rudder axis as on the Me 109 is difficult to solve in any other way.

engel me109 10

An almost ingenious solution is the wing attachment: two beech dowels screwed to a hardwood strip at the front and rear, which can and should break if overstressed, hence the predetermined breaking point. So no dowels sticking out at the sides and no rubbers either!

The ailerons are designed as flaps and are actuated directly by the control surfaces.

engel me109 11

In keeping with the original, the model also has a bipod undercarriage, but a tripod undercarriage can also be installed. This is not a solution for fans of true “naturalism”, but the tripod is recommended for participants in competitions.

However, the best thing about the design, and I want to say this deliberately at the end of the design chapter, is the well designed fuselage canopy. Take a look at the photo, it is really nice how far you can get to all parts of the electronic installation. From the fuel tank to the last steering gear, everything is open in front of you! Otherwise you always have to remove the wings of a low wing monoplane to get to the electronic guts.

engel me109 12

Flight and flight behaviour

Take-off, flight and landing of this “box” are nto different from those of other multi axis models. However, when taking off with the bipod undercarriage, the tail must be pulled to keep it on the ground until the model has enough speed to take off by itself!

When landing with the original undercarriage, i.e. bipod, the model will bounce with the tail due to the excess speed when touching down hard and then jump. On slopes and when using the Me 109 in competitions, it is therefore advisable to use a tripod to avoid points being deducted for an unclean landing or a landing in between. Schlüter, the father of the model Me, says of the aerobatic manoeuvre “Turn” that the Me “turns on the plate”.

engel me109 13

This tight turning during the turn should come from the support surface on the rudder. As a result of the trailing edges, the figures, like loops, should be very round and smooth. This is another reason why “spins” are only possible with rudder and elevator, without ailerons.

This is how the designer described flying his Me 109.

I flew a “civilian” version of the Me 109. It was only lightly sprayed with coloured stretch paint and had a good control surface. It almost hung on the engine. The light weight also brought the flight observations that Schlüter made.

engel me109 14

A second machine was also built and painted in the original colour. As I didn’t have time at the moment, I left the painting work to a friend. He is a “true to the original” enthusiast and even went to the German Museum with his pots of paint to mix the colours so that he could compare them exactly with the original!

So this model was very beautiful, but also not light, 3300 g ready to fly!
I would have loved to fly this elaborate, heavier machine. But we had difficulties with the engine and the next time we had trouble with the controls.

engel me109 15

In the meantime, the “real one” has already flown, but there has been no opportunity or time to really “crank it around” or “fly it out”.

In any case, I am convinced that there will hardly be any difference in the behaviour of the heavier “Real” and the lighter “Civil” in flight. The flight tests so far have clearly shown this.

engel me109 drawing01

engel me109 drawing02

I was also able to fly a tripod version once. The extra leg has no effect at all in flight, as long as the centre of gravity is correct. As already mentioned, however, the tripod is an advantage on a runway. The bipod version takes off perfectly on smooth turf.

A few words about the construction and paintwork: If you want to have the model for the sake of flying and construction, you can achieve a completely civilian effect with the separately available drop canopy, and also design the paintwork in such a way that nothing remains of a military aircraft or the Me 109. At the most, the shape is reminiscent of it. But if you want the original Me 109, you should build the model as accurately as possible. The paintwork must also be accurate and good. It doesn’t matter which operational type, but it should correspond to the original.

Text KT. Zech 1965
Photos: Helmut Kühnlein 2025

Leave a Reply

Your email address will not be published. Required fields are marked *